|
(1)
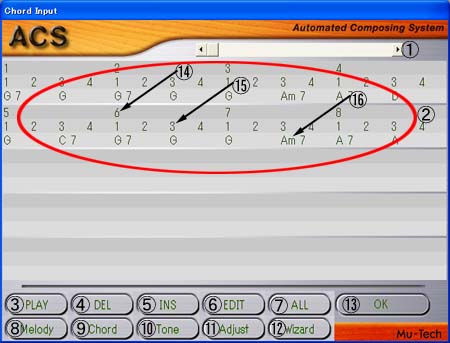
[Editing] slider
|
Specifies
the block you would like to edit. A chord is assigned for every block in
ACS.
|
|
(2) [Chord
Progression]
table
|
The number in the
first line indicates the bar number. The arrow (14)
indicates the 6th bar.
The number in the second line indicates the beat number. The arrow (15)
indicates the 3rd beat in the 6th bar.
The number in the third line indicates the chord name. The arrow (16)
indicates that the chord Am7 is used in the 3rd beat in the 7th bar.
|
|
(3) [PLAY]
button
|
Plays
music within the specified area.
|
|
(4) [DEL]
button
|
Deletes the selected area in the chord
progression. You can select the area by dragging the mouse.
|
|
(5)
[INS]
button
|
Inserts the selected blank. You can select the area by
dragging the mouse.
|
|
(6) [EDIT] button
|
Opens [Chord Edit] dialog box.
|
|
(7)
[ALL] button |
Selects all of the chord progression.
|
|
(8)
[Melody]
button |
Opens [Edit Melody]
dialog box.
|
|
(9)
[Chord]
button |
Opens [Edit Chord]
dialog box after you have specified the editing area by dragging the
mouse.
|
|
(10)
[Tone]
button |
Opens [Tone
Definition] dialog box.
|
|
(11)
[Adjust]
button |
[Adjustment]
dialog box.
|
|
(12) [Wizard] button
|
Opens [Style
Wizard] dialog
box.
|
|
(13) [OK]
button
|
Closes
[Chord Input] dialog box.
|